
A coffee thermos that smells stale ruins the taste of every drink. The fix is simpler than most people think. This guide covers the daily habits and weekly deep clean methods that keep any thermos fresh, odor-free, and hygienic all week long.
Coffee leaves behind more than a taste. Every time you fill your thermos, it deposits oils, tannins, and residue on the inner walls and inside the lid. Over time those deposits build up, turn stale, and produce the sour or musty smell that most thermos owners know well. The good news is that a small daily habit and one weekly deep clean is all it takes to prevent it completely.
01
Why Your Thermos Develops a Smell
A thermos is designed to hold heat. That same insulated environment also traps the compounds that cause odors. Coffee contains natural oils and acids. When left in a warm, enclosed container, those compounds break down and produce a stale, sour smell that lingers even after a rinse.
The problem gets worse over time because each new cup of coffee adds a fresh layer of residue on top of the old one. A thermos that is only rinsed, never brushed, builds up those layers steadily. Within a week or two, the smell becomes difficult to remove with rinsing alone.
What happens inside an uncleaned thermos
- Coffee oils coat the inner walls after each use
- Tannins leave dark staining on metal and glass
- Bacteria begin forming within 24 to 48 hours
- The lid traps residue in grooves and seals
- Damp storage accelerates mould growth
- Each new fill adds to existing residue layers
02
The Four Main Sources of Thermos Odor
Most thermos odor problems come from four specific areas. Understanding each one helps you clean more effectively and spend less time wondering why the smell keeps coming back.
- Coffee oil film builds up daily
- Invisible but detectable by smell
- Requires a bottle brush to remove
- Tannin staining sets in quickly
- Grooves and threads trap residue
- Silicone seal absorbs odors easily
- Needs a crevice brush to clean fully
- Often missed during daily washing
- Silicone absorbs coffee odors over time
- Needs soaking in baking soda solution
- Remove and clean separately if possible
- Replace if the smell persists after deep cleaning
- Saliva and coffee mix at the rim
- Residue dries quickly at the opening
- Easy to wipe but often forgotten
- Contributes to lid thread staining
03
The Daily Routine That Prevents Odours
Preventing thermos odor is far easier than removing it once it has set in. A two-minute daily routine done consistently is all you need to keep your thermos smelling fresh throughout the week.
- Empty any remaining coffee as soon as you are done using the thermos. Do not leave coffee sitting inside for hours.
- Rinse the thermos with warm water immediately after emptying to flush out loose residue while it is still liquid.
- Put a small drop of dish soap on your bottle brush and scrub the inner walls from top to base in circular motions.
- Rinse the main body thoroughly under warm running water until all soap is gone.
- Remove the lid and rinse it under warm water. Use a crevice brush on the lid threads, internal grooves, and around the silicone seal.
- Rinse the lid fully and set it aside from the thermos body.
- Stand the thermos upright with the opening facing up and leave the lid off. Allow both parts to air dry fully before reassembling.
04
The Weekly Deep Clean Method
Even with daily cleaning, coffee oils and tannins build up gradually on the inner walls of any thermos. A weekly deep clean removes that buildup before it produces a persistent smell. There are two reliable methods. Both use ingredients you already have at home.
The baking soda method
- Add one teaspoon of baking soda to the thermos.
- Fill with warm water and stir briefly to dissolve.
- Leave to soak for 20 to 30 minutes.
- Scrub the inside with your bottle brush and rinse well.
- Clean the lid separately in a baking soda solution and rinse.
The white vinegar method
- Fill the thermos halfway with equal parts white vinegar and warm water.
- Seal and shake gently for 30 seconds, then leave to soak for 15 minutes.
- Empty and scrub with a bottle brush and dish soap.
- Rinse very thoroughly to remove all vinegar smell before the next use.
- Soak the lid in the same solution while the body soaks.
05
Cleaning the Lid Properly
The lid of a coffee thermos is one of the hardest kitchen items to clean well. Most lids have multiple internal chambers, a screw thread, and a silicone seal. Each part collects residue in a slightly different way. A flat sponge or a quick rinse does not properly reach any of them.
Parts of the lid that need attention
- The screw thread collects dried coffee residue
- The drink spout traps the saliva and coffee mixture
- Internal flip or push mechanisms hide residue
- The silicone seal absorbs odors over time
- Any internal chambers around the seal groove
The right way to clean a thermos lid
- Remove the silicone seal if it detaches easily
- Soak the seal separately in warm soapy water
- Use a crevice brush on the thread and grooves
- Push a small brush through the drink spout
- Rinse every part under running water separately
- Dry the seal fully before replacing it
06
Removing Coffee Stains from Inside a Thermos
Coffee tannins leave a dark brown staining on the inner walls of any thermos over time. This staining does not affect safety, but it does hold odor, and it signals that residue has built up past the point where daily cleaning alone can remove it. There are three effective methods for removing it.
| Method | Best For | Soak Time |
|---|---|---|
| Baking soda paste | Light to moderate staining | 10 to 15 minutes |
| White vinegar soak | Mineral deposits and light staining | 15 to 20 minutes |
| Denture cleaning tablet | Heavy or long-set staining | 30 to 60 minutes |
| Dish soap and bottle brush | Fresh staining the same day | No soak needed |
The baking soda paste method for stains
- Mix baking soda with a few drops of water to form a paste
- Apply to your bottle brush and scrub the inner walls
- The mild abrasion lifts tannin staining without scratching
- Rinse very thoroughly after scrubbing
When to use a denture tablet
- Drop one tablet into warm water inside the thermos
- Leave for 30 to 60 minutes without sealing
- The fizzing action loosens heavy staining
- Always scrub and rinse thoroughly afterwards
- Effective on staining that has built up over weeks
07
Drying and Storing Your Thermos
How you dry and store your thermos between uses has as much impact on freshness as how you clean it. A properly cleaned thermos stored incorrectly will develop a smell within 24 hours. A few simple habits prevent this entirely.
The right drying method
- Stand the thermos upright with the opening facing up
- Always leave the lid off while drying
- Allow at least two hours before sealing
- Dry on an open rack rather than in a closed cupboard
- Shake out excess water before standing to dry
Storage habits that keep it fresh
- Never store a thermos with the lid sealed if any moisture remains
- Keep the lid beside the body rather than screwed on
- Store in a well-ventilated spot away from damp areas
- Avoid storing in a bag or drawer where air cannot circulate
- A short overnight dry is enough before the next morning's use
08
The Brush That Makes Thermos Cleaning Easy
Every method in this guide works best when you have the right brush for each part of the thermos. The inner body needs a long spiral bottle brush. The lid threads and seal need a small crevice brush. Together, these two tools cover every part of a thermos that collects coffee residue and odor.
The most practical option for daily kitchen use is a 3-in-1 cleaning brush set that combines a spiral bottle brush, a thin straw brush, and a bevel crevice brush in one compact set. It cleans every part of the thermos, the lid, and any straws in a single session without requiring separate tools.
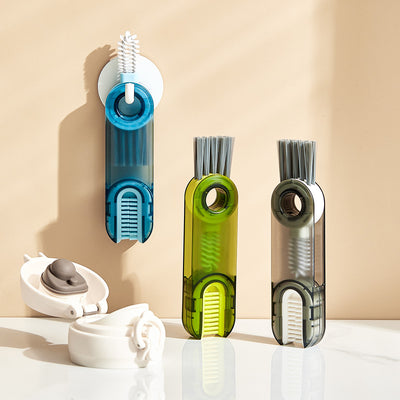
Recommended Tool
3-in-1 Bottle, Straw, and Lid Cleaning Brush
A spiral bottle brush, thin straw brush, and bevel crevice brush in one BPA-free, food-grade set. Cleans every part of your thermos kit in under three minutes.
From €6,41 Shop NowWhat to look for in a thermos cleaning brush
- Long enough to reach the thermos base fully
- Spiral or dome head for full wall contact
- A separate small brush for lid crevices
- BPA-free and food-grade materials throughout
- Dense nylon bristles that hold their shape
- Flexible enough for narrow-neck thermos bodies
For a full guide on choosing the right cleaning brush for bottles, straws, and thermos lids, read our article on the best bottle and straw cleaning brushes for a spotless kitchen. And to understand the full picture of what builds up inside any reusable container, our article on why your water bottle is dirtier than you think is a useful companion read.
FAQ
Questions People Also Ask
A Fresh Thermos Takes Less Than Three Minutes
A daily rinse and brush clean, one weekly baking soda soak, and a simple habit of drying with the lid off is all it takes to keep any coffee thermos smelling fresh all week. The right brush makes each step faster and more thorough. Clean the lid as carefully as the body and the smell stays away for good.
Get the Cleaning Brush from €6,41