
You wipe the counters and wash the dishes. But there are spots in your kitchen that almost never get cleaned. They collect dirt, mold, and bacteria every single day. This guide shows you exactly where they are and how to reach them.
Most people focus on visible surfaces when they clean the kitchen. But the real hygiene problem is in the narrow, deep, and hidden spots inside your everyday items. These places stay wet and warm. That makes them the perfect environment for bacteria to grow. Regular sponges and dishcloths simply cannot reach them. The good news is that the right tool changes everything.
01
The Kitchen Spots Most People Never Clean
Most cleaning routines stop at what you can easily see. The countertop gets wiped. The dishes get washed. The stovetop gets scrubbed. But a whole range of everyday kitchen items have hidden areas that collect bacteria silently over time. These spots are not just dirty. They can affect the taste of your food and drinks and create real hygiene problems for your household.

Good kitchen hygiene in Belgium and across Europe is about more than visible cleanliness. It is about the inside of the items you drink from and cook with every day. Here are the spots that get missed most often.
- Grooves trap liquid every use
- Rubber seals hide residue underneath
- Mold grows fast in damp channels
- Rinsing does not clean crevices
- Bottle necks collect mineral deposits
- Base grooves trap old residue
- Standard brushes do not fit inside
- Odors build up without scrubbing
- Inner walls trap drink residue daily
- Biofilm forms within 24 to 48 hours
- Outer rinse does not clean inside
- Thin straw brushes are the only fix
- Coffee and tea stain inner walls
- Narrow openings block cleaning tools
- Stale odors build without scrubbing
- Long flexible brushes reach the base
02
Cup Lid Dirt: The Most Overlooked Problem
Cup lid dirt is one of the most common hidden hygiene problems in the kitchen. Most reusable cup lids have small grooves, rubber seals, and internal channels. Coffee, tea, and juice get trapped inside after every use. A quick rinse under the tap does not remove this residue. Over time it builds into stubborn deposits and mold.
Inside the Lid Groove
- Residue hides under rubber lid seals
- Internal channels stay damp between uses
- Mold grows fast in enclosed damp spaces
- Rinsing alone leaves most residue behind
- A small angled brush reaches every groove
What Builds Up Over Time
- Coffee and tea deposits darken lid channels
- Sugary drinks leave sticky residue inside
- Protein drinks cause fast-growing buildup
- Mineral deposits form in hard water areas
03
Narrow Bottle Grooves and Neck Areas
Reusable water bottles often have narrow grooves at the base and around the neck. These areas are too tight for a standard bottle brush. Narrow groove cleaning requires a thin, flexible brush that can reach inside and scrub all the way around the inner walls. If you skip this step, your bottle will smell or taste off even after a full wash.
The Bottle Neck
- Mineral buildup clings to the neck rim
- Saliva and drink residue dry here overnight
- Wide bottle brushes miss this narrow zone
- A spiral brush scrubs the neck walls clean
- Weekly cleaning prevents odor buildup
The Base and Inner Walls
- Old drink residue pools at the base
- Grooves at the base trap dark deposits
- Flexible brushes reach the bottom corners
- Rinse after every brush clean with warm water
04
Straw Inner Walls: Clean on the Outside, Dirty Inside
Reusable straws look clean on the outside. But inside the narrow channel, the walls build up with milk, juice, and smoothie residue after every use. This is one of the most common hidden hygiene problems in any kitchen. Cleaning inside a straw requires a thin straw brush that runs all the way through the channel from one end to the other. Without it, bacteria form a biofilm on the inner walls within 24 to 48 hours.

After Sugary or Protein Drinks
- Juice and smoothie residue dries on inner walls
- Milk deposits cause fast bacterial growth
- Protein shake residue smells strongly when left
- Clean within 30 minutes of drinking these
- Flush with warm water before brushing
The Daily Straw Cleaning Method
- Rinse the straw immediately under warm running water.
- Put a small drop of dish soap on the tip of a thin straw brush.
- Push the brush through from one end to the other.
- Pull back and push through again from the opposite end.
- Rinse under warm water while rotating the straw to flush out all soap.
- Stand upright on a drying rack and allow to air dry fully before storing.
For a full guide on straw cleaning methods and materials, read our article on how to clean reusable straws without any hassle.
05
Cleaning Inside a Thermos: Harder Than It Looks
Cleaning inside a thermos is harder than most people expect. The narrow opening and long interior make it almost impossible to reach the bottom and sides with a standard cloth or sponge. Coffee and tea leave brown stains that bond to the inner walls. These stains affect the taste of your drinks and can harbor bacteria over time. You need a long brush with a soft tip to scrub all the way down inside.
Breaking Down Coffee and Tea Stains
- Coffee tannins bond tightly to inner walls
- Tea leaves dark rings near the waterline
- A baking soda paste removes these stains safely
- Spiral brush tips reach the base of the thermos
- Rinse three times to remove all baking soda
The Deep Clean Method for a Thermos
- Add one teaspoon of baking soda and warm water to fill the thermos halfway.
- Seal and shake gently for 30 seconds to loosen residue on the walls.
- Pour out the solution, then insert a long spiral brush and scrub in circular motions.
- Push the brush all the way to the base and work it back up slowly.
- Rinse twice under warm running water and leave the thermos open to dry fully.
06
Bottle Cap Crevices: Small Spots, Big Hygiene Risk
Bottle caps and flip lids often have small crevices around the seal and hinge area. These spots stay moist after every wash and collect bacteria quickly. Most people wash the cap under running water but never actually scrub the crevices. A small crevice cleaning brush with a pointed or angled tip is the only way to get into these areas and remove the hidden dirt that builds up every day.
The Hinge and Seal Area
- Hinge areas trap moisture and drink residue
- Silicone seals hide mold underneath them
- Water alone does not dislodge buildup here
- Angled brush tips clean crevices with ease
- Check all bottle caps during your weekly clean
07
Coffee Filter Holders: Bitter Coffee Starts Here
If you use a reusable coffee filter or filter basket, the inner edges and rim collect coffee grounds and oils with every brew. These build up into a dark, oily layer over time. Regular rinsing cannot remove it because the rim area is narrow and recessed. Skipping this step leads to bitter-tasting coffee and hygiene issues inside your machine.
The Rim and Inner Edge
- Coffee oils coat the inner basket rim
- Grounds pack into filter holder grooves
- Bitter taste signals old oil buildup
- Small corner brushes reach the rim edges
- Clean after every brew for fresh-tasting coffee
08
Water Decanter Necks: Mineral Buildup You Cannot See
Glass water decanters and carafes have long, narrow necks that are almost impossible to clean with a cloth or standard bottle brush. Mineral deposits and watermarks build up on the inside glass with every fill. Over time this affects both water taste and the clarity of the glass. A long, flexible brush with a soft tip is the right tool to reach inside the neck and scrub the inner walls clean.
Inside the Decanter Neck
- Mineral deposits cling to the inner glass
- Narrow necks block regular cleaning tools
- Watermarks build up from daily refilling
- Long spiral brushes pass through the neck
- Weekly clean keeps glass crystal clear
For Stubborn Mineral Scale
- Fill with equal parts vinegar and warm water
- Leave for 20 minutes to dissolve the scale
- Push a long brush through and scrub the walls
- Rinse twice and dry with the neck facing down
09
A Simple Routine for Every Hidden Spot
Building a short cleaning routine helps you stay on top of these problem areas. You do not need a lot of time. A few minutes with the right brush is enough to keep every item in your kitchen truly clean.
| Frequency | Task | Tool Needed |
|---|---|---|
| After every use | Brush straw inner walls and cup lid grooves | Thin straw brush and bevel corner brush |
| Daily | Scrub bottle neck after every wash | Spiral bottle brush |
| Weekly | Deep clean thermos and bottle cap crevices | Long spiral brush and crevice brush |
| Weekly | Scrub coffee filter holder rim and decanter neck | Angled corner brush |
| Monthly | Vinegar soak for thermos and decanter | Long brush and soaking solution |
10
The Right Tool for Every Hard-to-Reach Spot
Most cleaning problems come from using the wrong tool for the job. A large sponge cannot fit inside a thermos. A dishcloth cannot reach inside a straw. A standard bottle brush misses the neck groove and the cap crevice. You need small, purpose-built brushes designed for narrow groove cleaning.
The 3-in-1 Multifunctional Crevice Cleaning Brush is designed exactly for these spots. It includes three different brush heads in one compact tool. Each head is made for a different type of hard-to-reach area in your kitchen.
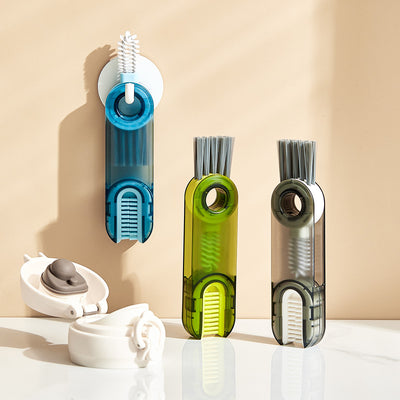
Recommended Tool
3-in-1 Bottle, Cup Lid, and Straw Crevice Cleaning Brush
A spiral bottle brush, bevel corner brush, and sponge tip in one BPA-free food-grade tool. Reaches every hard-to-clean spot in your kitchen in one session.
From €6,41 Shop NowThree Brush Heads in One Compact Tool
- Spiral brush reaches narrow bottle grooves
- Bevel corner brush cleans cup lid crevices
- Sponge tip removes stubborn inner stains
- Stainless steel handle provides a firm grip
- Food-grade BPA-free materials are fully safe
- Compact size fits any kitchen drawer easily
Every Kitchen Item It Cleans
- Water bottles and thermos flasks
- Reusable straws and cup lids
- Coffee filters and tea kettles
- Wine decanters and glass carafes
- Baby bottles and feeding containers
- Flower vases and teapots
For a full breakdown of the best cleaning brushes for your entire kitchen, read our guide on the best bottle and straw cleaning brushes for a spotless kitchen.
FAQ
Questions People Also Ask
A Cleaner Kitchen Starts with the Spots You Cannot See
Wiping counters and washing dishes is not enough. The real hygiene challenge is inside cup lids, bottle grooves, thermos flasks, and reusable straws. A compact crevice cleaning brush reaches every one of these spots in minutes. It takes very little time and makes a real difference to what you drink from every day.
Get the Cleaning Brush from €6,41