
Metal, silicone, glass, or bamboo - every reusable straw needs more than a quick rinse. Here is the simplest method for cleaning them properly and keeping them safe every day.
Switching to reusable straws is one of the easiest ways to reduce single-use plastic at home. But a reusable straw only stays hygienic if you clean it properly after every use. The inside of a straw is a narrow, dark channel that traps drink residue and moisture. Without the right tool and method, that residue builds up fast. This guide covers everything you need to know to clean reusable straws quickly, correctly, and without hassle.
01
Why Reusable Straws Need Proper Cleaning
The inside of a straw is one of the hardest spots in your kitchen to clean. The channel is narrow, often long, and completely enclosed. Every time you drink through a straw, a small amount of liquid, saliva, and residue gets left behind inside the tube.

That residue does not dry out cleanly. It sits in a damp environment with no airflow. Within 24 to 48 hours, bacteria begin to form a sticky layer called biofilm on the inner surface. Left longer, mold can appear, especially in straws stored damp or in a closed container.
What Builds Up Inside a Straw
- Saliva and drink residue coat the inner walls after every use
- Sugary drinks like juice, smoothies, and flavored water feed bacterial growth fastest
- Milk and protein-based drinks leave a film that breaks down quickly and smells strongly
- Coffee and tea leave tannin stains that darken the inside of lighter-coloured straws
- Even plain water leaves mineral deposits over time in hard water areas
02
Different Straw Types and Their Cleaning Needs
Reusable straws come in four main materials. Each one has slightly different cleaning considerations. Understanding the differences helps you clean your straws the right way for their material.
- Most durable and long-lasting
- Cannot see inside to check cleanliness
- A brush is always essential
- Dishwasher-safe, but a brush is still needed
- Can conduct heat from hot drinks
- Soft walls can trap residue in folds
- Absorbs odors more easily than metal
- Needs a flexible straw brush
- Baking soda soak removes odors well
- Check for warping if dishwashed at high heat
- Only the straw type where you can see inside
- Shows buildup clearly before it gets serious
- Dishwasher-safe in most cases
- Still needs a brush for the inner walls
- Handle with care to avoid chips
- Most eco-friendly option available
- Cannot go in the dishwasher
- Needs hand washing and quick drying
- Replace every few months as fibers wear
- Not suitable for very hot drinks
03
The Daily Cleaning Method
This method takes under two minutes and keeps your straw genuinely clean after every use. Do this the same day you use the straw, not the next morning.
- Rinse the straw immediately under warm running water to flush out loose residue while it is still liquid.
- Put a small drop of dish soap on the tip of your straw cleaning brush.
- Insert the brush into one end of the straw and push slowly through to the other end.
- Pull back and push through again. The bristles scrub the inner walls on both passes.
- Rinse the straw under warm running water while rotating it to flush all soap out of the channel.
- Hold the straw up to the light or look through it to check the inside is clear.
- Stand the straw upright or lay it on a drying rack and allow it to air dry fully before storing.
04
The Weekly Deep Clean
Even with daily cleaning, a deep clean once a week removes any buildup the brush may have missed, eliminates odors, and keeps your straws looking and smelling fresh.
The Vinegar Soak Method
- Fill a tall glass or container with equal parts white vinegar and warm water.
- Place your straws inside and allow them to soak for 15 to 20 minutes.
- After soaking, push the straw brush through from both ends with a little dish soap.
- Rinse thoroughly under warm running water and dry fully before storing.
The Baking Soda Method
- Dissolve one teaspoon of baking soda in a cup of warm water.
- Use a small syringe or squeeze bottle to push the solution through the straw channel.
- Leave to sit for five minutes, then brush through and rinse well.
- This method works especially well for silicone straws that have absorbed odors from smoothies or coffee.
05
Cleaning by Drink Type
Not all drinks leave the same residue. Some need faster action and a more thorough cleaning than others. Here is a quick guide by drink type.
| Drink Type | Clean Within | Special Step |
|---|---|---|
| Water | Same day | None needed |
| Juice or soft drink | Within 1 to 2 hours | Sugar residue feeds bacteria quickly |
| Coffee or tea | Same day | Baking soda paste for staining |
| Smoothie | Within 30 minutes | Flush with warm water first to loosen pulp |
| Milk or protein shake | Within 30 minutes | Rinse immediately, brush clean right away |
06
Using a Dishwasher for Reusable Straws
A dishwasher can be part of your straw cleaning routine, but it cannot be your only method. Here is what it does well and where it falls short.
What the Dishwasher Does Well
- Kills bacteria on the outer surface of metal and glass straws with heat
- Removes light residue from the outside of the straw
- Convenient for cleaning multiple straws at once
- Works well when combined with a brush clean before loading
Where the Dishwasher Falls Short
- Water jets cannot enter the narrow channel of most straws at the right angle
- Biofilm on inner walls remains largely untouched after a dishwasher cycle
- Silicone straws can warp slightly in high-temperature cycles
- Bamboo straws must never go in the dishwasher, as the heat splits the material
- Small straws can fall through the basket gaps and block the spray arm
07
Drying and Storing Your Straws
Cleaning is only half the job. How you dry and store your straws determines whether mold grows back between uses. This step is where most people go wrong.
The Right Way to Dry a Straw
- After washing, shake the straw gently to remove water from the channel
- Stand it upright in a cup or jar, open end up, so air circulates through the channel
- Alternatively, lay it flat on a clean drying rack with both ends fully exposed to air
- Allow at least one to two hours before storing, or leave overnight if washed in the evening
- Never store a damp straw in a closed case, pouch, or drawer immediately after washing
Storage That Keeps Straws Fresh
- A breathable fabric pouch or open-ended case allows air to circulate between uses
- A small jar or cup on the counter keeps straws upright and aired without a case
- Avoid airtight containers unless the straw is completely dry, with no moisture inside the channel
- If you carry a straw in a bag, choose a vented or mesh case rather than a sealed tube
08
The Right Brush Makes All the Difference
No method in this guide works without the right straw brush. A standard sponge, cotton swab, or pipe cleaner does not have the right bristle density or length to scrub a straw channel properly. You need a brush that is designed for the job.
The most practical choice for everyday kitchen use is a 3-in-1 cleaning brush that includes a dedicated straw brush, a spiral bottle brush, and a bevel crevice brush. That way, you clean your straw, bottle, and cup lid in one session with a single compact tool.
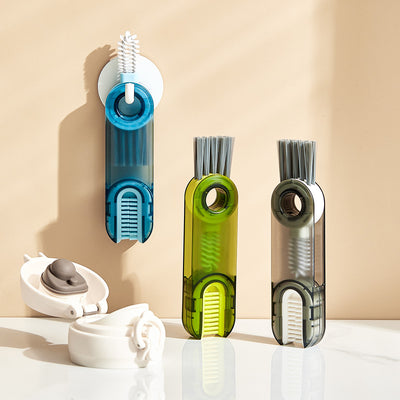
Recommended Tool
3-in-1 Bottle, Straw, and Lid Cleaning Brush
A thin straw brush, spiral bottle brush, and bevel crevice brush in one BPA-free, food-grade tool. Cleans every part of your reusable kit in under three minutes.
From €6,41 Shop NowWhat a Good Straw Brush Needs
- A thin profile under 4 mm to fit inside most standard straw diameters
- A flexible wire core that bends slightly for curved or angled straws
- Dense nylon bristles that make contact with the inner walls on each pass
- Food-grade, BPA-free materials that are safe for daily contact with drinking surfaces
- A long enough handle to push fully through the straw without your fingers entering the opening
For a complete guide on choosing the right brush for your whole kitchen, including bottles, lids, and straws, read our article on the best bottle and straw cleaning brushes for a spotless kitchen.
FAQ
Questions People Also Ask
Clean Straws Take Less Than Two Minutes
A thin straw brush, warm soapy water, and two minutes after every use is all it takes to keep your reusable straws hygienic, odor-free, and safe for daily drinking. The method is the same for every material. The only thing that changes the result is whether you have the right brush for the job.
Get the Cleaning Brush from €6,41